
Creating an AWS account is the first task when we want to explore and use AWS resources. This sounds simple enough – we just need an email and a credit card to set it up. But here’s what matters: as the creator of an AWS account, we might be creating resources in the cloud for an organisation. That means we’ll be responsible for the security, management, and scalability of the organisation in the cloud. Get it wrong, and we could expose data or rack up huge bills.
This article focuses on all the basic steps that help set up a secure and scalable AWS account.
Sign up for AWS as an Account Root User (ARU)
When we sign up to create our first AWS account with an email address and a credit card, our AWS identity becomes the Account Root User.
As account root users, we have the highest privilege with the account we created. We can access anything in the account and cannot be restricted. But that’s exactly the problem – if our account credentials get leaked to a hacker, they’d have complete control. That’s why AWS best practice is to avoid using AWS resources directly with root user privilege.
Instead, we’ll create an IAM user as the admin of our account later in this article. For now, the account root user serves one purpose: laying the foundation for that IAM admin user. We’ll use it to create the IAM admin user and grant them permission to use AWS resources and manage costs. Then we can step back from using the root user for day-to-day work.
Secure the root account with Multi-factor authentication (MFA)
Right after signing up as an account root user, we should immediately activate multi-factor authentication for the account. Here’s why this matters: these factors are additional proof that let AWS confirm our identity before granting access.
The factors can be linked to something we possess – our device, fingerprint, voice, or other personal identifiers that provide more information about us as users. The more factors we use in the authentication process, the harder it becomes for hackers to fake our identity.
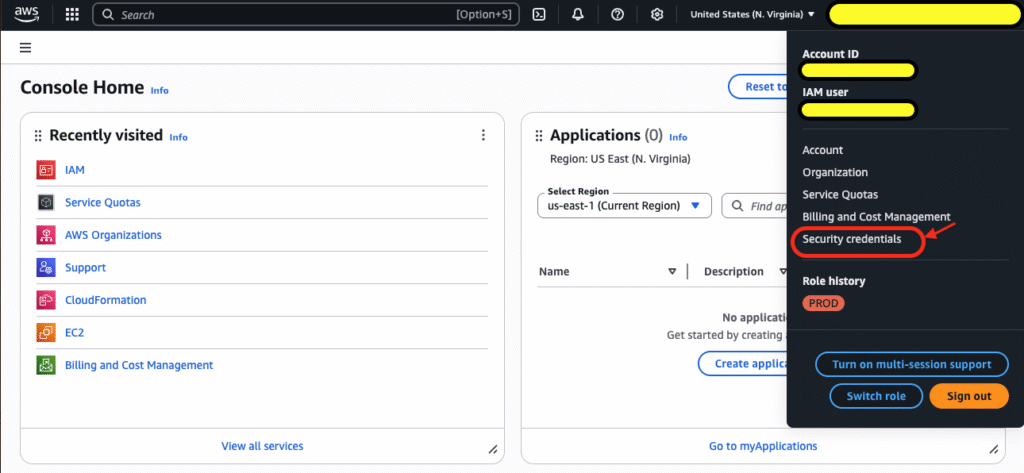
To activate MFA, click on Security Credentials option under the account name.
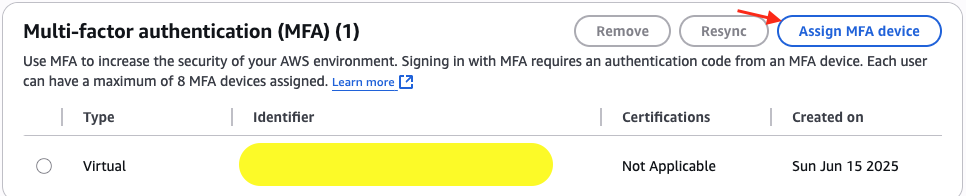
This will open security settings where we can find the MFA section. Click on to assign MFA device
The MFA device here can be a passkey or security key, an authenticator app, or a hardware TOTP token. The quickest option is using an authenticator mobile app like Google Authenticator.
Once we assign the device, AWS generates a secret key and embeds it in a QR code that we can scan to transfer it into the authenticator app. The authenticator app then uses this key to generate access codes that we can use to log into our AWS account.
To test if our MFA configuration works, we should log out of the account and log back in. We’ll see AWS request additional information that looks like this:

The initial billing and budget settings
In this step, we’re going to set up billing preferences so AWS sends us monthly invoices automatically. This way, we don’t need to log into the account just to see how much we owe. We’ll also create a budget with a threshold that triggers an email alert if we cross it.
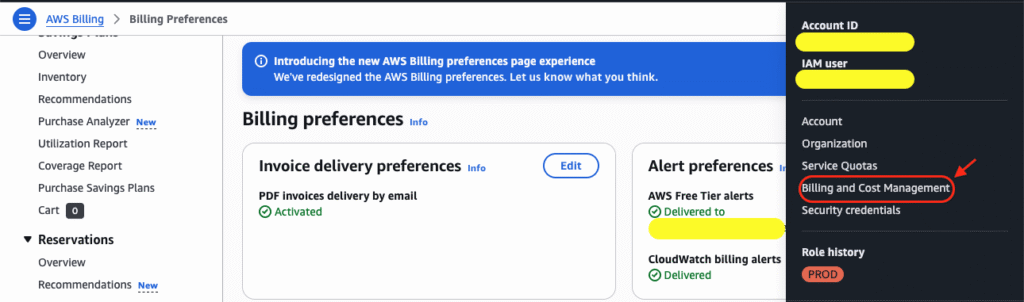
Under our account name, we’ll go to the Billing and Cost Management section, then select Billing Preferences from the menu on the left:
Here we can config the alerts and invoice delivery preferences to automatically send to our email.
For the budget threshold, we’ll want to create a spending alert that warns us before things get out of hand. This prevents any surprise bills from creeping up on us.
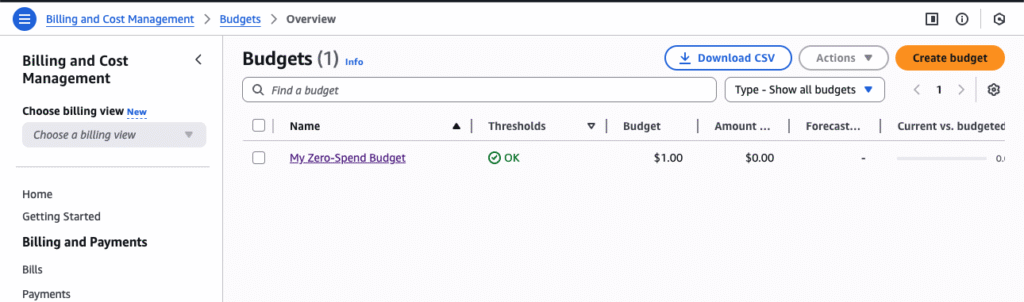
We’ll go to the Budget section and create a new budget. Here we can set a zero spending budget, or a monthly spending limit – maybe start with something reasonable like $10 or $20 for testing purposes. Then we’ll configure it to send us an email alert when we hit around 80% of that threshold. This gives us a heads up before we actually exceed our budget, so we can investigate what’s driving the costs and make adjustments if needed.
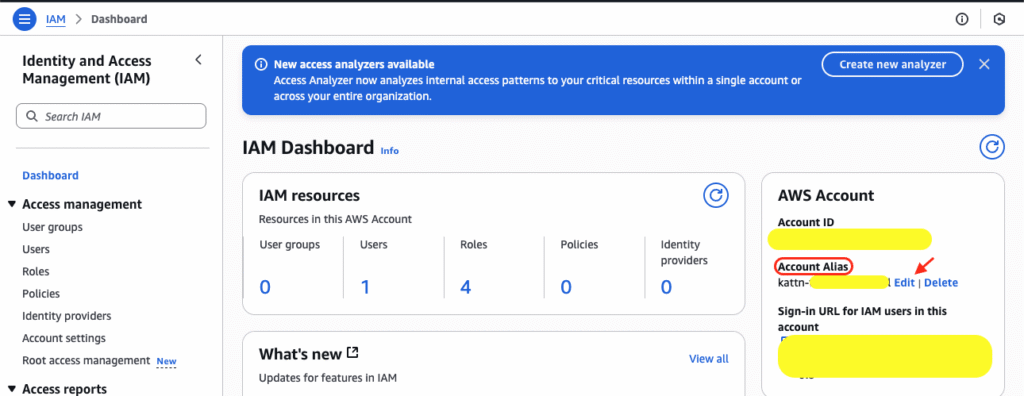
Set up an account alias
This step is optional, but personally, I think it will help us navigate better in the future when we have multiple AWS accounts to manage.
An account alias is basically a custom name we can give to our AWS account instead of using the default 12-digit account ID. So instead of remembering something like “123456789012,” we can use “mycompany-prod” or “testing-account.”
It makes logging in much more intuitive, especially when we’re juggling different accounts for different projects or environments. We’ll find this option in the Identity and Access Management (IAM) dashboard under “Create Account Alias” – just pick something memorable and professional that makes sense for what this account will be used for.
The importance of IAM user and how to create IAM user in a secured way
Stay in the same IAM console because in this step we are going to create IAM admin user for the account.
Here’s why this matters: remember how we talked about the root user having unlimited access? That’s exactly what we want to avoid using for day-to-day work. An IAM admin user gives us nearly the same power but with better security controls and the ability to track what we’re doing.
Think of it this way – the root user is like having the master key to everything, while an IAM admin user is like having a really good key that opens most doors but can still be controlled and monitored. If something goes wrong with the IAM user, we can always use the root user to fix it.
To create our IAM admin user securely, we’ll start by going to Users in the IAM console and clicking “Create User.” Here are the key things to keep in mind:
- The username does not need to be unique, just need to be clear – something that makes it obvious this is an administrative account.
- Check on the option to allow this user to access AWS Management Console
- It’s better to let the user create their own password at first sign-in
Next, we’ll attach the AdministratorAccess policy, which gives the user permissions to manage almost everything in our AWS account.
At the end of the process, we have an option to send email instructions to the user. This is helpful if we’re setting this up for someone else. Here’s the crucial part: for any IAM user account we create, we need to secure it with MFA. The best approach is to tell the admin user to log in immediately and set up MFA for their account as well. Two-factor authentication isn’t optional – it’s essential.
Allow IAM user access to billing and monitor costs
IAM user, though with Admin Access permission, is still blocked from viewing the billing information and monitoring costs. This is because AWS see financial information as extra-sensitive, and AWS wants the actual account owner (the root user) to explicitly decide who can see it. Since we want to avoid using the root user for daily tasks, we need to grant our IAM admin user access to billing data.
To enable this, we’ll go back to the Billing and Cost Management section under our root user account. Look for “IAM User and Role Access to Billing Information” in the account settings. We’ll need to activate this setting, which allows IAM users with the right permissions to access billing data.
Once that’s enabled, our IAM admin user will be able to see costs, create budgets, and monitor spending just like the root user can. This keeps our cost management workflow clean and secure – no more switching between accounts just to check how much we’re spending.
Final checklist
Here’s your final checklist for setting up a secure and scalable AWS account:
- Root User Setup
- Create AWS account with email and credit card
- Activate MFA for root user account
- Set up billing preferences for automatic monthly invoices
- Create budget with threshold alerts (start with $10-20 for testing)
- Create account alias for easier login (optional but recommended)
- IAM Admin User Setup
- Create IAM admin user with clear username
- Enable AWS Management Console access
- Set user to create password at first sign-in
- Attach AdministratorAccess policy
- Send email instructions to user (if setting up for someone else)
- Billing Access & Security
- Enable “IAM User and Role Access to Billing Information” in account settings
- Instruct admin user to log in immediately and set up MFA
- Test both root user and IAM admin user login with MFA
- Final Step
- Stop using root user for daily tasks – switch to IAM admin user for everything
Once this checklist is complete, we’ll have a properly secured AWS account that follows best practices and won’t come back to bite us later.